The advantages of a RockBoard MOD interface module, and how to install it on Pedaltrain and Voodoo Lab pedalboards
Sometimes routing a signal to a pedalboard, or away from it, may prove a little complicated. Making a board ergonomically sensible usually demands to place the most stepped-on pedals in the lower row and/or to the sides of the board. Correspondingly the pedals at the start or end of the signal path might be placed in the middle of the board.
In such cases using a patchbay – a connector interface panel – is a very good idea.

We have long been using Best-Tronics "D" series patch panels, which are well made and reliable units.

Voodoo Lab has also released its own patchbay module for their Dingbat pedalboards, called the Dingus.

We often install cable snake from pedalboard to the amplifier as an integral part of the pedalboard, as this has proven to be a very sturdy and gig-worthy solution. In some cases, though, unplugging the leads might be necessary. This is where the easiest, most practical and most sensible solution is using a dedicated patchbay, installed at the edge of the board, to take care of all incoming and outgoing cables.

Due to Pedaltrain pedalboards being very popular, German brand RockBoard have developed their RockBoard MOD V2 patchbay series for use with Pedaltrain frames. The series comprises passive patchbays with different connector types, as well as modules with active DI-boxes and speaker emulation.
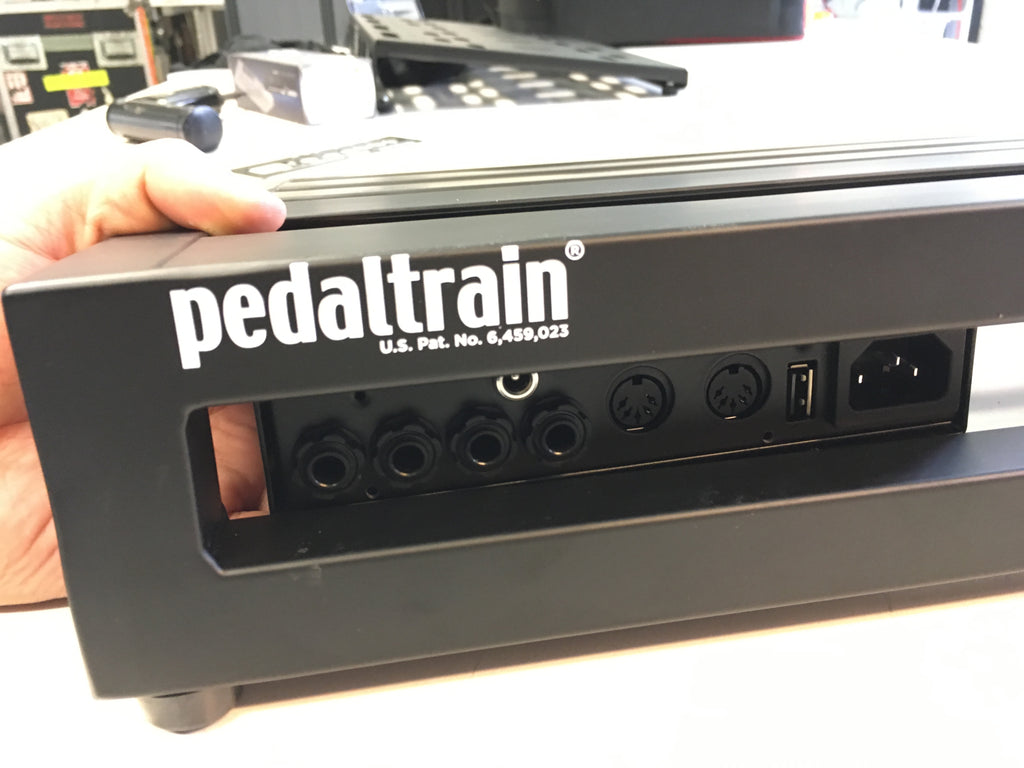
ROCKBOARD MOD 1 V2

The RockBoard MOD 1 V2 module includes five phone jacks, one XLR output and one power connector. This patchbay works great if you need a whole bunch of phone connectors to hook up FX loops, amp channel switching, or if you want to send the output signal to more than one amplifier. If your board contains a DI-box, or if you’re using an effect with an XLR output, you can connect this signal to the module’s XLR output.
The module doesn’t require any power to work. The jack connectors work both with mono and stereo plugs, which makes this module even more versatile.
This patchbay also includes a 2.1 mm DC output, if you need to power an external pedal, such as a wah-wah. Simply hook up one of your PSU’s DC outputs to the patchbay’s input, and you’re ready to connect a power cable to your external effect.
ROCKBOARD MOD 2 V2
The RockBoard MOD 2 V2 comprises two MIDI ports and a USB port, in addition to its four phone connectors and IEC power input. If you’re controlling your rig via MIDI, or if your board contains a bypass looper that can be programmed using a USB port, or if you use a digital effect and you don’t want to constantly unplug the USB connector, RockBoard’s MOD 2 V2 is the right patchbay for you.
This module, too, includes a 2.1 mm DC connector for powering outboard pedals. Like on the MOD 1, the phone jacks on the MOD 2 work both with mono and stereo plugs, and this module is also completely passive.
ROCKBOARD MOD 3 V2

RockBoard’s MOD 3 V2 is aimed at singers and players of acoustic instruments. The module works great if you’re running a vocal effect on your board and/or a dedicated preamp or DI-box for acoustic instruments.
The MOD 3 comes with three phone connectors, which work in mono or stereo, a power connector, an XLR input for a vocal mic or similar, as well as two XLR outputs as sends for a vocal signal and/or the DI signal of an acoustic guitar.
There’s a 2.1 mm DC output on this patchbay, too. The module works completely passively.
ROCKBOARD MOD 5 V2

The RockBoard MOD 5 V2 is the series’ flagship model. This patchbay includes three passive mono/stereo phone jacks, but also an IR-based speaker emulator designed by Mooer, which is connected to its dedicated XLR output. The speaker emulator comes factory-equipped with six different impulse response cabinet models, but you can change the IR-models via USB. You can also find a headphone output for silent practicing.
In addition to the XLR output there’s also a phone output, running in parallel, but without the speaker emulation. This makes it possible to run the speaker emulated signal straight into the PA’s mixer, while using the “dry” signal to run your amp on stage. A ground lift switch helps defeating possible ground loop hum.
Due to the on-board speaker emulation, this model is the only one in the series that needs its own power to run. The patchbay requires 9 volts DC and 300 milliamperes, which means it can be powered with the board’s PSU. The module’s own DC input follows the 2.1 mm standard (centre negative).
Routing AC-power through the RockBoard modules
All of the series’ modules, except MOD 5 V2, come equipped with a standard grounded IEC connector for feeding the board's power supply. If you use a Power Supply made by Voodoo Lab or Strymon, you can use this cable to route the AC-power through the module. The Cioks power supply models Cioks DC7 and Cioks DC10 Link also use this type of connector.


ROCKBOARD MOD RACK

On some Pedaltrain frames a RockBoard MOD Rack can be useful when installing the patchbay. RockBoard’s MOD Rack can be used with all of the V2-series modules, which are the ones we have in our selection. Older V1 Module-versions don’t fit the MOD Rack mounting kit.
To screw the RockBoard MOD Rack kit into place you’ll need to drill two 2.5 mm holes into the Pedaltrain frame. As these are made of relatively soft aluminium, you can drill the holes with a regular cordless drill.
You need to remove the patchbay’s front panel by unscrewing it from the module. Then the patchbay is installed in the MOD Rack with the screws you can find in the box. The installation uses two screws that grip the module from each side. You can also use those screws for a little sideway adjustment of the module.
As the MOD Rack kit requires you to remove a module’s front panel, in most cases, you can mark the inputs and outputs with coloured tape.
Installing a RockBoard module on a Pedaltrain and Voodoo Lab pedalboards
In Pedaltrain frames the type of installation varies, depending on the specific pedalboard model, and the placement of the RockBoard module itself. It is possible to install a module on top of a pedalboard, too, just like an effect pedal. In these cases, we’d recommend using 3M Dual Lock. We’ve compiled all the possible installation types in a handy chart for you. You can download the RockBoard installation chart here. 

1) Top - facing back

The easiest way to attach a module is to use 3M Dual Lock, and simply place the patchbay onto the pedalboard, with its connectors facing to the back. You can use this style of installation on all of the pedalboard frames on the market. The patchbay’s connectors will be protected by the board’s back edge.
2) Top - facing side

Another option is to place the module on top of the pedalboard with its connectors facing sideways. As some of the modules sport control knobs and/or switches that stand proud of the module’s surface, it is important to check that the board still fits inside its bag or case, without any switch being squeezed or bent out of place. You can use this style of installation on all of the pedalboard frames on the market.
3) Between rails - facing back

On Pedaltrain’s Classic and Novo pedalboards you can install the patchbay module to the underside of the frame, using the MOD Rack installation kit, without module's faceplate.
One big advantage of this type of installation is that the module doesn’t take up space on the board, and that all connectors are very well protected by the frame structure. It’s important to note, however, that this style of installation works with straight plugs only.
4) Underneath - facing side

If you’re using a Pedaltrain Classic Pro board, or any of the Novo series frames, you can also install the patchbay module facing sideways by using the MOD Rack kit. Thanks to the depth adjustment in the MOD Rack, you can adjust how far back the module is placed underneath your board.

You can also attach a module – once you’ve taken off the module's faceplate – on Voodoo Lab Dingbat Small, Medium and Large pedalboards with 3M Dual Lock. We’d strongly recommend using the black version of Dual Lock, due to its stronger grip.

Because the sides of a Voodoo Lab Dingbat Medium or Large pedalboard are curved, you will need to apply a double layer of 3M Dual Lock. On Dingbat Small frames you can use just a single layer.
5) Between rails - facing up

Sometimes it might come in handy to have all the patchbay connectors easy to reach, by placing the module on top of the frame with its connectors facing up. This can be a time saver in the studio, for example.

This type of installation is only possible on Pedaltrain Classic and Novo series boards, and it requires a MOD Rack kit. If you place the patchbay like this, you won’t need to remove its front panel.
6) Underneath to the middle rail

If you want to protect the patchbay’s connectors especially well, you can attach the module underneath the board to the second-to-last frame rail on Pedaltrain Classic and Novo series boards, using a MOD Rack kit. Adjust the the MOD Rack’s depth, so that the connectors won’t touch the floor.
*****
If you have purchased all the parts and components but get a feeling that you might not be up to the task after all, we can make your pedalboard for you, using the components you have bought from us. Don’t worry, we won’t let anything go to waste.